Showing posts with label Techniques. Show all posts

Sunday, March 27, 2011

March Block 1 - Turnstile Piecing

Sorry on a couple of fronts.
Sorry for taking so long to get these instructions out....
And double sorry for actually suggesting an incredibly tricky block this month!!

I've sewn my 3 blocks together, and they proved to be very tricky to get right - not quite what I was after this month.  The biggest problem with this block is that the final seam results in a very precarious situation of trying to match multiple points.  Not at all ideal for beginners!

My suggestion is that you pop this one aside until after you have done the Ohio Star.  But - if you are still keen for a challenge (or maybe just a glutton for punishment!) read on....

Step 1 

Lay your blocks out somewhere flat.  You will keep coming back to this layout, so it needs to be on your sewing area.

Step 2
Fold the smaller triangles on top of each other and pin the seams that you need to sew.  When you pin, make sure that every part of the triangle is matched.  The pieces are the same size, and there shouldn't be any overlap.


Step 3
Sew the pieces together using your 1/4" seam allowance.  As you sew, try to avoid stretching the fabric as it is on the bias and it will affect your final result.


The next image shows a good result when getting to the end of a triangle seam.  Corners still matching!


Take a great deal of care when sewing the end of any triangles.  This is where your pointy bits will open up, and if they do, it will affect the size of the square you are making (2 isosceles triangles make a bigger triangle, and then two more make a square.....)
This image shows how the corners spread and its going to need some gentle manipulation to line them back up again.

This is also an ideal block to practise your chain piecing - where you sew a number of pieces together in a chain, and then cut them apart at the end.


I find with triangles its usually easiest to sew from the square side - not the pointy side.


Step 4
Cut the pieces apart, and iron out flat.  Usually press to the dark side.  You can see that at the top of the triangle there is a piece sticking out.  This isn't needed and you can cut it off.


 If you are interested in buying templates that avoid this step, I thoroughly recommend Marti Michell's system of templates.  They are fabulous!!!  I have a couple of sets, and they make piecing patchwork far more accurate than you can ever get using paper pieces.

Step 5
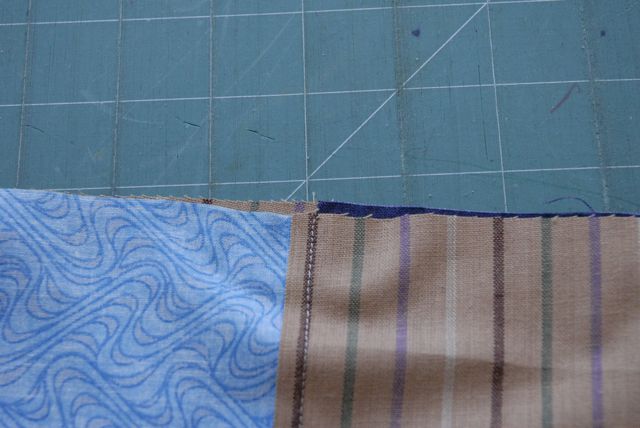
Return to your flat layout and look at the next pieces to sew.  Here you will be sewing the larger triangle to the pieced triangle.


These pieces SHOULD be the same size.  If they aren't, you have a problem.


Overlap them carefully.  Ensure every side matches - they are all important when you are making a square.  Pin in at least 3 places and sew. 


Take a great deal of care when sewing these pieces.  Not only are they possibly on the bias (so they are stretchy), they are also teeny tiny, and you need to keep them perfectly aligned.


Step 6
Open your four pieces up and iron flat.  You will see this time you have 2 little pieces that can be cut off.


Check for their squareness.  Look for any wobbly sewing.  You could even measure the pieces here on a ruler and check for squareness if you are really worried.
Return to your flat layout and assemble.


Step 7
This is the tough bit.  If you have made any mistakes before now, it will be blaringly obvious when you try to do this next seam!
Now you will sew 2x2 squares.  Its tricky because in the corner of one seam you have points to match.  If you have ironed all your seams to the same side, you should be able to butt the seams against each other and ensure that your point will match.


Pin the corner, and then check the rest of the square.
Remember - these squares should be identically sized, so its important that you align all the edges of the pieces.

From here you will end up with 2 rectangles, again they should be the same side, but mirror imaged.


Before you put the right sides together, have a close look at the centre of the block.    There will be a point in the middle, and from there to the edge should be a perfect 1/4".  When you seam these pieces together, your seam allowance will ensure that all the triangles meet in the middle.


Often I find that one of my seams is slightly larger than the other.  So I usually pull the seam open and double check what sort of overlap I might need to design into the sewing to ensure a nice match.

When you are happy that your final point is going to match, pin along the seam, ensuring that all sides of the pieces are aligned.  If they aren't, you will need to ease the seam when you are sewing to get the best result.


When you are sewing the final seam, stop just before the middle.  This is where the most impact comes from the design, so its important to get it right.
In this picture, and on your block, you will see where the last 2 seams overlap.  Its actually where you will see the point on the right side.  So you need to stitch right on that cross (x marks the spot.....).
Depending on the bulk of the fabric, sometimes you can sew a bit to the right of the cross, but never sew inside the cross otherwise you truncate your points.


Open out your block and see what the result is like!  This was my first effort - I wasn't happy so I unpicked either side of the central line and resewed it.


Step 8
Press flat and admire!
If you get this right, big ups to ya!  Its a tricky block, and I'm not sure why there are a number of seams where you sew on the bias and the grain.


Out of my 3 blocks, I was actually only really happy with one.  The pink one was the worst by far.  Its WAAAAAAY out!  I'm even too scared to measure the final dimensions in case its completely stuffed.


This last one I took alot of care sewing the seams and matching pieces very carefully before pinning.  I'm pretty happy with it.


So - sorry's all around.  I'll get onto my Ohio Star this week in case some of you want a more gentle introduction to triangles.....
Happy sewing, and please remember to ask any questions or leave any comments.  I'm feeling a little lonely on this project, so I would love your feedback.

Tuesday, March 8, 2011

March Block 1 - Turnstile

We are back!  And ready to do the blocks for March.
This month we are going to look at 2 blocks, and each one involves triangles.

The first one is called Turnstile and the template can be found here

When you print off the 12" block template, set your printer to US letter, and ensure that its not shrinking to fit.  When the page comes out, there is a scale thing on the side that you need to check measures 1".  REALLY important to check this!!!

So print the page out, cut out the templates and you are ready to select your fabric.  If you were doing a whole quilt of this exact block, you would use something firmer than paper for your template.  A good idea is to use the hard plastic stuff you can get from Spotlight (I can't remember the name of this stuff.... spot the one with baby brain!!!!) and then you use that to cut out everything.


Here are my fabric selections.  You need 3 fabrics, one feature, one dark and one contrast.


I'm going to do 3 blocks of each this month as I am hoping others will be keen to do a quilt for a charity - plenty of well-deserving recipients at the moment!

Iron your fabric, and put the template on the fabric, paying careful attention to the arrow.  This arrow must be aligned with the grain.  It can either be the cross grain or the selvedge grain, either one is fine.  It only really matters which way you go if you have a directional pattern as opposed to an overall pattern.

Use your ruler carefully and cut around the template.  You can see the seam allowance is allowed for, so you cut right on the edge of the paper.  Be very accurate, and use pins to hold the template on.

I'm a bit of a scrooge when it comes to fabric.  I have to use my fabric very carefully, and I try to maximise the fabric, and I try to leave big useable chunks of fabric, rather than little pieces.


When you have cut all the fabric, you can lay it out and see what arrangement looks best.  IN the sample, they use the dark fabric on the outside to frame the block, and I have to say I like it best like this.  But there is nothing to say you can't arrange it whichever way you want to.

I'll do a post in a day or so on how to sew the triangles together.  In time you will be able to look at these blocks and figure out how to do it.  Normally you go from little pieces to big!  So you will join the two smaller triangles, then attach them to the bigger triangle, and then you have a four patch to put together.

I've also finished my log cabin, and that's ready to give away to my midwife.  Photos to follow!

Saturday, February 12, 2011

Finishing off a Quilt - 1. Borders

This is my log cabin all sewed up from January.  I'm quite happy with it!


So the next job is finishing the quilt by applying the borders.  Borders really bring a quilt to life!  Plus they give it alot more size.  I didn't have the time to choose my own borders with the new baby, so I sent Shane into the local patchwork shop to a salesperson I really trust (who has impeccable taste) with a list, and this is what she sent out!
I love it!
I'm going for finished 2" borders of the blue (so cut 2.5") and 5.5" outer borders.  If you take your finished quilt top into any patchwork shop they will be able to calculate your required meterage for borders.  I also have enough of the floral to do the binding as well.

The first job is cutting the borders.  I didn't iron first - very naughty!!


Depending on how much fabric you have, you can cut with the length, or across the length.  In the case of the inner borders, I only have about 0.5m, so I need to cut my strips across the length.  This means I'll need to join strips to get enough length across the quilt top.  So I'm cutting 6 strips.
  

Once you have sewn length on the strips, you iron them, and lay them across your quilt top - in the middle of the quilt.  This is a really important step as it allows you to square up your quilt top.
A log cabin is fairly easy to square up as there is a lovely line that runs through the middle of the quilt.

Trim the blue border on each side accurately.  I usually do this with a cutting board under the quilt and use a ruler and a rotary cutter.  This time I used scissors....  Not that good really.


Pin on opposite sides of the quilt and sew.

Iron out flat, and follow the same process with the other side.
This really makes a big difference.  The idea is that when you cut the strips at the length of the centre of the quilt, both ends will be the same.  So you can just sew it and cut off the extra - you need this to be square.
Trim, pin and sew.


Once you have completed the inner border, its time to do the outer border, and its just following the same process.
Lay the strips out in the middle of the quilt.
Trim, pin, sew and iron.


Repeat on the other side.
One thing to be very cautious about is whether your print has a direction on it.  If it does (like mine does) try to ensure that you get the print facing all the same way. 


Once you have sewn the outer border on the quilt, you are done!  Now its time to make the batting sandwich and quilt it.


What do you think of my finished product (or at least finished quilt top) ?  Its amazing how the borders will really finish a quilt off.  And once the padding is beneath it, there is a whole new effect to it.
I really like it - its scrappy, but very pretty.   I think Stephanie from Grandmother's Garden did a lovely job in her fabric selection!  The blue is great.
This quilt is going to my midwife to say thanks for giving me a healthy little baby boy.  I'm hoping to have it done by Tuesday when she comes over, but machine quilting is not my forte!  We shall see.

Next post - making the batting sandwich.


Tuesday, February 1, 2011

February 9 Patch 12" - 2. Basic Scrap Block

This is a great block as it can use up any 5" charm squares you might have lying around.
I just happened to have these 4x 4.5" blocks in my stash from another project, and I decided that I would just use them.
I needed a background to tie them all in, and thought I'd be ambitious with a stripe!

So - here are my fabrics:

Now the trick with stripes is to cut along the stripe, rather than with the grain.  Because this is a woven stripe (meaning the stripe is part of the fabric body - its not just printed on) its easy to cut once you line your ruler up with the stripe.


Cut your 9 squares, and lay them out:

This way you can tell if the block is going to look OK or not.  This is a verrrrrrry basic block - I'm hoping it will look OK once its in a quilt with sashings and the like.

Next job is pin.  Now you can do multiple pieces at once - it saves getting up and down.  So I pin them as soon as I put the right sides together, that way I know exactly where I need to sew my seams.


Sew up using a 1/4" seam allowance.  Don't sew over your pins like me.... I take my machine's life in my hands every time I do.


When you get to the end of the first piece, put your needle in the down position.  Lift up your foot slightly and put the next piece under - then sew.  This is called chain piecing.  Its used when you are sewing lots of pieces, and saves loads of time!


 I had a lovely image of the pieces all together once sewn, but it didn't download for some reason - but its kinda like a flag bunting.  Snip between each of the pieces, iron to the dark side and return to your layout.


 You can see how all the pieces are coming together now.  This is an easy block to finish off in terms of the order of sewing.  I'm going to sew the left 3 pieces together, and then the right single strip, and then attach the two together.


From here we need to match our points.  Remember how I said to iron to the dark side?  Well if you did, you will have a situation a bit like this.

 You can see that the seams are ironed off to each side, and actually the middle part - or the line where you want to match up will sit snugly up against the other piece.  Kinda like they lock together. 
 You want this, and when you have them firmly locked, pin.  Then pin each end of what you are going to sew, and sew it.  When you get to the seams, make sure that the one on the bottom stays folded in the right way - if you have any movement of this at the needle your points wont match.


The next stage of your block will look like this, and this is the toughest part to get the points matching.

Fold the right sides together, and get the seams locking together.  Work on one at a time.  Pin each of the points, and then work on the  sides.  Its most important to get the points matched, and then if the sizes are different, you need to ease the remainder of the seam.  So you stretch the short pieces and pin in lots of places to ensure that they all match up.

The more accurate your sewing and 1/4", the easier it is to line everything up!  Obviously when you have loads of small pieces all together, the challenge is to make multiple seams correct so the final product is right.


Here's my final block - it really is incredibly simple, and not too challenging for an experienced patchworker, so I've decided to do something a little more tricky.....


This will be the one I seam up and show you tomorrow.  Already cut out, ready to go!


Happy sewing, and remember to leave a comment if you have anything you would like to pass on to me.