Haven't been very regular with my blog. In fact I haven't been reading many blogs at all lately, so maybe thats why the motivation got up and left.
Life is OK. Kids are fine, I am fine, Shane is fine, Baby is fine.
I've been doing lots of knitting and sewing. Many finished projects on Ravelry.
More posts to come. And I need to get back into the Block of the Month Quilt-a-long for TNN. I've been a bit slack there. We'll have to do 3 blocks to catch up!!
Monday, June 13, 2011
Tuesday, April 5, 2011
How to achieve balance
It never ceases to amaze me how hard it is to make the right decision. From lifestyle choices to what we eat and drink, it seems that its almost impossible to be perfect.
What matters for one family doesn't seem so important for others, so as parents we all walk this tight rope of trying to do the best for our children.
A great example is organic food. Its expensive, but its supposedly good for you. Perhaps stops cancer forming. Better for the environment. If you are buying meat or poultry, perhaps a better life for the animals.
Yet the price is restrictive for some, and lets face it - sometimes its nice to have a big perfect apple with no scars or animal marks.
On the other hand you could feed your children a wonderfully balanced diet - not too much red meat, plenty of fish and their 5 plus a day of fruit and veges. Dairy - where to get the calcium from. Cheese, processed or standard? High fat or low?Buy milk from the farm gate - unpasteurised perhaps? Or maybe you want to go vegan and look at soy or rice milk. But then again, are lots of soy products good for your kids?
When you give your children their veges, do you count potato as one of them? Are you ensuring they get leafy greens as well as those veges high in starch? Do you try to give your children a "rainbow" of food each day?
Do you give your kids juice - organic or not, or do you simply give them water? Are you filtering the water? Are you drinking from a fluorinated supply?
Enough of food, how about immunisations? Are you a conscientious objector believing that MMR causes austism? Or perhaps you think that the mercury will harm, or perhaps the monkey brains is not much trot? Do you accept that the HPV vaccine (gardisil) will actually prevent your daughter getting cervical cancer?
What about birth control. Rhythm or condoms? OCP or IUD? Vasectomy for him or tying tubes for her?
Schooling - private or public? Home school? Extend or hold back? Gifted and talented - encourage or mainstream?
Co sleeping? Controlled crying? Baby wearing?? Attachment parenting? Pram? Front facing, rear facing? Booster after 5 or in the front seat?
Sports, Music, Ballet, Speech and Drama.
Vege gardening at home?
Free range eggs?
Make your own clothes or buy them?
Electric car or walk? 4WD or motorbike?
I don't know about you, but all the choices we have in life, and all the inherent judgement associated with life choices bamboozles me. Of course I want to do the best for my family, but I get overwhelmed with the number of right decisions. I haven't got the energy to get it all right, so I look for balanced based on my perception of acceptable risk.
We vaccinate - Against pretty much everything (except that stoopid HPV one). We even pay for the flu jabs for adults and opted for Chicken Pox for the kids. I understand there is a bit of discomfort for the kids, but I do believe for the general population that vaccination is for the community.
My decision is right for me, but wrong for so many others. Sometimes though - I just don't have the energy to fight.
Can't we all just get along? Accept others differences and leave it at that.
Now I'm off to feed my kids dinner. Its white rice cause they like that, and its cooked in the microwave cause thats how I get the best result. They are having devilled sausages from homekill sausies cause they are yummier and have less crap in them, and I made the sauce from scratch because I never quite know whats in those packets.
I'll give them some veges, maybe some frozen beans and raw carrots - none of them organic or from the garden at the mo.
And I'll probably give them water or low fat milk to wash it down. A piece of fruit for pudding.
Wow - all that decision making means I need a large glass of wine to recover.......
Sunday, March 27, 2011
March Block 1 - Turnstile Piecing
Sorry on a couple of fronts.
Sorry for taking so long to get these instructions out....
And double sorry for actually suggesting an incredibly tricky block this month!!
I've sewn my 3 blocks together, and they proved to be very tricky to get right - not quite what I was after this month. The biggest problem with this block is that the final seam results in a very precarious situation of trying to match multiple points. Not at all ideal for beginners!
My suggestion is that you pop this one aside until after you have done the Ohio Star. But - if you are still keen for a challenge (or maybe just a glutton for punishment!) read on....
Step 1
Lay your blocks out somewhere flat. You will keep coming back to this layout, so it needs to be on your sewing area.
 Step 2
Fold the smaller triangles on top of each other and pin the seams that you need to sew. When you pin, make sure that every part of the triangle is matched. The pieces are the same size, and there shouldn't be any overlap.

Step 3
Sew the pieces together using your 1/4" seam allowance. As you sew, try to avoid stretching the fabric as it is on the bias and it will affect your final result.

The next image shows a good result when getting to the end of a triangle seam. Corners still matching!

Take a great deal of care when sewing the end of any triangles. This is where your pointy bits will open up, and if they do, it will affect the size of the square you are making (2 isosceles triangles make a bigger triangle, and then two more make a square.....)
This image shows how the corners spread and its going to need some gentle manipulation to line them back up again.

This is also an ideal block to practise your chain piecing - where you sew a number of pieces together in a chain, and then cut them apart at the end.

I find with triangles its usually easiest to sew from the square side - not the pointy side.

Step 4
Cut the pieces apart, and iron out flat. Usually press to the dark side. You can see that at the top of the triangle there is a piece sticking out. This isn't needed and you can cut it off.


If you are interested in buying templates that avoid this step, I thoroughly recommend Marti Michell's system of templates. They are fabulous!!! I have a couple of sets, and they make piecing patchwork far more accurate than you can ever get using paper pieces.
Step 5
Return to your flat layout and look at the next pieces to sew. Here you will be sewing the larger triangle to the pieced triangle.

These pieces SHOULD be the same size. If they aren't, you have a problem.

Overlap them carefully. Ensure every side matches - they are all important when you are making a square. Pin in at least 3 places and sew.

Take a great deal of care when sewing these pieces. Not only are they possibly on the bias (so they are stretchy), they are also teeny tiny, and you need to keep them perfectly aligned.

Step 6
Open your four pieces up and iron flat. You will see this time you have 2 little pieces that can be cut off.

Check for their squareness. Look for any wobbly sewing. You could even measure the pieces here on a ruler and check for squareness if you are really worried.
Return to your flat layout and assemble.

Step 7
This is the tough bit. If you have made any mistakes before now, it will be blaringly obvious when you try to do this next seam!
Now you will sew 2x2 squares. Its tricky because in the corner of one seam you have points to match. If you have ironed all your seams to the same side, you should be able to butt the seams against each other and ensure that your point will match.

Pin the corner, and then check the rest of the square.
Remember - these squares should be identically sized, so its important that you align all the edges of the pieces.
From here you will end up with 2 rectangles, again they should be the same side, but mirror imaged.

Before you put the right sides together, have a close look at the centre of the block. There will be a point in the middle, and from there to the edge should be a perfect 1/4". When you seam these pieces together, your seam allowance will ensure that all the triangles meet in the middle.

Often I find that one of my seams is slightly larger than the other. So I usually pull the seam open and double check what sort of overlap I might need to design into the sewing to ensure a nice match.
When you are happy that your final point is going to match, pin along the seam, ensuring that all sides of the pieces are aligned. If they aren't, you will need to ease the seam when you are sewing to get the best result.

When you are sewing the final seam, stop just before the middle. This is where the most impact comes from the design, so its important to get it right.
In this picture, and on your block, you will see where the last 2 seams overlap. Its actually where you will see the point on the right side. So you need to stitch right on that cross (x marks the spot.....).
Depending on the bulk of the fabric, sometimes you can sew a bit to the right of the cross, but never sew inside the cross otherwise you truncate your points.

Open out your block and see what the result is like! This was my first effort - I wasn't happy so I unpicked either side of the central line and resewed it.

Step 8
Press flat and admire!
If you get this right, big ups to ya! Its a tricky block, and I'm not sure why there are a number of seams where you sew on the bias and the grain.
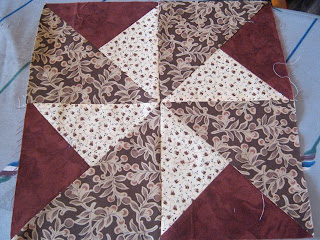
Out of my 3 blocks, I was actually only really happy with one. The pink one was the worst by far. Its WAAAAAAY out! I'm even too scared to measure the final dimensions in case its completely stuffed.

This last one I took alot of care sewing the seams and matching pieces very carefully before pinning. I'm pretty happy with it.

So - sorry's all around. I'll get onto my Ohio Star this week in case some of you want a more gentle introduction to triangles.....
Happy sewing, and please remember to ask any questions or leave any comments. I'm feeling a little lonely on this project, so I would love your feedback.
Sorry for taking so long to get these instructions out....
And double sorry for actually suggesting an incredibly tricky block this month!!
I've sewn my 3 blocks together, and they proved to be very tricky to get right - not quite what I was after this month. The biggest problem with this block is that the final seam results in a very precarious situation of trying to match multiple points. Not at all ideal for beginners!
My suggestion is that you pop this one aside until after you have done the Ohio Star. But - if you are still keen for a challenge (or maybe just a glutton for punishment!) read on....
Step 1
Lay your blocks out somewhere flat. You will keep coming back to this layout, so it needs to be on your sewing area.

Fold the smaller triangles on top of each other and pin the seams that you need to sew. When you pin, make sure that every part of the triangle is matched. The pieces are the same size, and there shouldn't be any overlap.

Step 3
Sew the pieces together using your 1/4" seam allowance. As you sew, try to avoid stretching the fabric as it is on the bias and it will affect your final result.

The next image shows a good result when getting to the end of a triangle seam. Corners still matching!

Take a great deal of care when sewing the end of any triangles. This is where your pointy bits will open up, and if they do, it will affect the size of the square you are making (2 isosceles triangles make a bigger triangle, and then two more make a square.....)
This image shows how the corners spread and its going to need some gentle manipulation to line them back up again.

This is also an ideal block to practise your chain piecing - where you sew a number of pieces together in a chain, and then cut them apart at the end.

I find with triangles its usually easiest to sew from the square side - not the pointy side.

Step 4
Cut the pieces apart, and iron out flat. Usually press to the dark side. You can see that at the top of the triangle there is a piece sticking out. This isn't needed and you can cut it off.


If you are interested in buying templates that avoid this step, I thoroughly recommend Marti Michell's system of templates. They are fabulous!!! I have a couple of sets, and they make piecing patchwork far more accurate than you can ever get using paper pieces.
Step 5
Return to your flat layout and look at the next pieces to sew. Here you will be sewing the larger triangle to the pieced triangle.

These pieces SHOULD be the same size. If they aren't, you have a problem.

Overlap them carefully. Ensure every side matches - they are all important when you are making a square. Pin in at least 3 places and sew.

Take a great deal of care when sewing these pieces. Not only are they possibly on the bias (so they are stretchy), they are also teeny tiny, and you need to keep them perfectly aligned.

Step 6
Open your four pieces up and iron flat. You will see this time you have 2 little pieces that can be cut off.

Check for their squareness. Look for any wobbly sewing. You could even measure the pieces here on a ruler and check for squareness if you are really worried.
Return to your flat layout and assemble.

Step 7
This is the tough bit. If you have made any mistakes before now, it will be blaringly obvious when you try to do this next seam!
Now you will sew 2x2 squares. Its tricky because in the corner of one seam you have points to match. If you have ironed all your seams to the same side, you should be able to butt the seams against each other and ensure that your point will match.

Remember - these squares should be identically sized, so its important that you align all the edges of the pieces.
From here you will end up with 2 rectangles, again they should be the same side, but mirror imaged.

Before you put the right sides together, have a close look at the centre of the block. There will be a point in the middle, and from there to the edge should be a perfect 1/4". When you seam these pieces together, your seam allowance will ensure that all the triangles meet in the middle.

Often I find that one of my seams is slightly larger than the other. So I usually pull the seam open and double check what sort of overlap I might need to design into the sewing to ensure a nice match.
When you are happy that your final point is going to match, pin along the seam, ensuring that all sides of the pieces are aligned. If they aren't, you will need to ease the seam when you are sewing to get the best result.

When you are sewing the final seam, stop just before the middle. This is where the most impact comes from the design, so its important to get it right.
In this picture, and on your block, you will see where the last 2 seams overlap. Its actually where you will see the point on the right side. So you need to stitch right on that cross (x marks the spot.....).
Depending on the bulk of the fabric, sometimes you can sew a bit to the right of the cross, but never sew inside the cross otherwise you truncate your points.

Open out your block and see what the result is like! This was my first effort - I wasn't happy so I unpicked either side of the central line and resewed it.

Step 8
Press flat and admire!
If you get this right, big ups to ya! Its a tricky block, and I'm not sure why there are a number of seams where you sew on the bias and the grain.

Out of my 3 blocks, I was actually only really happy with one. The pink one was the worst by far. Its WAAAAAAY out! I'm even too scared to measure the final dimensions in case its completely stuffed.

This last one I took alot of care sewing the seams and matching pieces very carefully before pinning. I'm pretty happy with it.

So - sorry's all around. I'll get onto my Ohio Star this week in case some of you want a more gentle introduction to triangles.....
Happy sewing, and please remember to ask any questions or leave any comments. I'm feeling a little lonely on this project, so I would love your feedback.
Friday, March 25, 2011
On being crazy.....
So it's been a rough 6m, and understandably I'm still a bit fragile.
I think because it all happened so quickly (the brain tumour that is) I've probably got PTSD. Thinking that I really need to talk to someone, I decided to ask my GP for a referral to Maternal Mental Health at Campbell's 6 week check up.
She went through the questionnaire and because there were a couple of key questions I gave sensible answers for, it seems that I'm not quite crazy enough to qualify for the service. They rang yesterday, and went through the questionnaire again with me (but tried to be all subtle about it), but again because I don't lie awake at night, and because I don't think of self harm, I'm not crazy! And then she went on to say that she thinks the way I'm feeling is because of life, not having a baby. I love that they can distinguish between the different sorts of crazy.
I guess I'm a little frustrated with a system that makes it difficult to get help once you have asked for it. I don't have a history of depression, and I'm not into self harm, and all I really want is to have a good cry and get the crazies out of my system.
I'd like to be able to think about brain surgery without crying! I'd like to be able to talk to health professionals (Neurosurgeon's, midwives, GP's, Occupational Therapists, ENT people etc etc etc) without crying as soon as someone mentions what life was like about 6m ago.
Anyway, I'll just keep treading water, coping very well, but knowing that at any moment it could all come crashing down. Its hard when people look at you externally thinking that you are doing pretty well (which I am, I know) but inside its all a little fragile. There is nothing I would like more than to spend the whole day in bed, and not have to get up and take the kids to school.
I'm well over driving. We are planning a Sth Island 3 week holiday later in the year, and I'm a bit pissy that I have to do all the driving of the motorhome. The Marlborough Vineyards are going to be no fun at all when I have to drive. Although - I guess I could just park up the van for the night and really enjoy myself.
Roll on November when Shane can drive again!
Monday, March 14, 2011
Our new girls....
Here they are having their first taste of freedom.

That big hole in the vege garden has resulted from the scallopini that got ripped out a few days ago. My goodness did that produce this year! We must have had 30-40 pieces from it. We were giving them away everywhere.

We would like to let them out more often, but we have to ensure the cat and the dog are locked up inside before opening the cage. Jenna starting feeding them from her hand tonight, so hopefully they will become very tame in time.
They are only 15w old, so they start producing eggs in a week or two. Can't wait!!!
Tuesday, March 8, 2011
Log Cabin Finished


I love the boldness of the red hearth in the centre of each block, and the blue border sets it off.

I didn't enjoy machine quilting it at all (I never do....) but its a simple job that looks OK.

I'm slowly getting used to my digital SLR. Some settings are still a mystery to me, I really need to do a course or something, but I am starting to play around a bit more to get different effects.
And just to finish off, a gratuitous shot of the (not so) wee fella.

March Block 1 - Turnstile
We are back! And ready to do the blocks for March.
This month we are going to look at 2 blocks, and each one involves triangles.
The first one is called Turnstile and the template can be found here
When you print off the 12" block template, set your printer to US letter, and ensure that its not shrinking to fit. When the page comes out, there is a scale thing on the side that you need to check measures 1". REALLY important to check this!!!
So print the page out, cut out the templates and you are ready to select your fabric. If you were doing a whole quilt of this exact block, you would use something firmer than paper for your template. A good idea is to use the hard plastic stuff you can get from Spotlight (I can't remember the name of this stuff.... spot the one with baby brain!!!!) and then you use that to cut out everything.

 Here are my fabric selections. You need 3 fabrics, one feature, one dark and one contrast.
I'm going to do 3 blocks of each this month as I am hoping others will be keen to do a quilt for a charity - plenty of well-deserving recipients at the moment!
 Iron your fabric, and put the template on the fabric, paying careful attention to the arrow. This arrow must be aligned with the grain. It can either be the cross grain or the selvedge grain, either one is fine. It only really matters which way you go if you have a directional pattern as opposed to an overall pattern.
Use your ruler carefully and cut around the template. You can see the seam allowance is allowed for, so you cut right on the edge of the paper. Be very accurate, and use pins to hold the template on.
I'm a bit of a scrooge when it comes to fabric. I have to use my fabric very carefully, and I try to maximise the fabric, and I try to leave big useable chunks of fabric, rather than little pieces.

When you have cut all the fabric, you can lay it out and see what arrangement looks best. IN the sample, they use the dark fabric on the outside to frame the block, and I have to say I like it best like this. But there is nothing to say you can't arrange it whichever way you want to.


I'll do a post in a day or so on how to sew the triangles together. In time you will be able to look at these blocks and figure out how to do it. Normally you go from little pieces to big! So you will join the two smaller triangles, then attach them to the bigger triangle, and then you have a four patch to put together.
I've also finished my log cabin, and that's ready to give away to my midwife. Photos to follow!
This month we are going to look at 2 blocks, and each one involves triangles.
The first one is called Turnstile and the template can be found here
When you print off the 12" block template, set your printer to US letter, and ensure that its not shrinking to fit. When the page comes out, there is a scale thing on the side that you need to check measures 1". REALLY important to check this!!!
So print the page out, cut out the templates and you are ready to select your fabric. If you were doing a whole quilt of this exact block, you would use something firmer than paper for your template. A good idea is to use the hard plastic stuff you can get from Spotlight (I can't remember the name of this stuff.... spot the one with baby brain!!!!) and then you use that to cut out everything.


I'm going to do 3 blocks of each this month as I am hoping others will be keen to do a quilt for a charity - plenty of well-deserving recipients at the moment!

Use your ruler carefully and cut around the template. You can see the seam allowance is allowed for, so you cut right on the edge of the paper. Be very accurate, and use pins to hold the template on.
I'm a bit of a scrooge when it comes to fabric. I have to use my fabric very carefully, and I try to maximise the fabric, and I try to leave big useable chunks of fabric, rather than little pieces.

When you have cut all the fabric, you can lay it out and see what arrangement looks best. IN the sample, they use the dark fabric on the outside to frame the block, and I have to say I like it best like this. But there is nothing to say you can't arrange it whichever way you want to.


I'll do a post in a day or so on how to sew the triangles together. In time you will be able to look at these blocks and figure out how to do it. Normally you go from little pieces to big! So you will join the two smaller triangles, then attach them to the bigger triangle, and then you have a four patch to put together.
I've also finished my log cabin, and that's ready to give away to my midwife. Photos to follow!
Saturday, February 12, 2011
Finishing off a Quilt - 1. Borders
This is my log cabin all sewed up from January. I'm quite happy with it!

So the next job is finishing the quilt by applying the borders. Borders really bring a quilt to life! Plus they give it alot more size. I didn't have the time to choose my own borders with the new baby, so I sent Shane into the local patchwork shop to a salesperson I really trust (who has impeccable taste) with a list, and this is what she sent out!
 I love it!
I'm going for finished 2" borders of the blue (so cut 2.5") and 5.5" outer borders. If you take your finished quilt top into any patchwork shop they will be able to calculate your required meterage for borders. I also have enough of the floral to do the binding as well.
The first job is cutting the borders. I didn't iron first - very naughty!!

Depending on how much fabric you have, you can cut with the length, or across the length. In the case of the inner borders, I only have about 0.5m, so I need to cut my strips across the length. This means I'll need to join strips to get enough length across the quilt top. So I'm cutting 6 strips.

Once you have sewn length on the strips, you iron them, and lay them across your quilt top - in the middle of the quilt. This is a really important step as it allows you to square up your quilt top.
A log cabin is fairly easy to square up as there is a lovely line that runs through the middle of the quilt.

Trim the blue border on each side accurately. I usually do this with a cutting board under the quilt and use a ruler and a rotary cutter. This time I used scissors.... Not that good really.

Pin on opposite sides of the quilt and sew.

Iron out flat, and follow the same process with the other side.
 This really makes a big difference. The idea is that when you cut the strips at the length of the centre of the quilt, both ends will be the same. So you can just sew it and cut off the extra - you need this to be square.
Trim, pin and sew.


Once you have completed the inner border, its time to do the outer border, and its just following the same process.
Lay the strips out in the middle of the quilt.
Trim, pin, sew and iron.


Repeat on the other side.
One thing to be very cautious about is whether your print has a direction on it. If it does (like mine does) try to ensure that you get the print facing all the same way.

Once you have sewn the outer border on the quilt, you are done! Now its time to make the batting sandwich and quilt it.

What do you think of my finished product (or at least finished quilt top) ? Its amazing how the borders will really finish a quilt off. And once the padding is beneath it, there is a whole new effect to it.
I really like it - its scrappy, but very pretty. I think Stephanie from Grandmother's Garden did a lovely job in her fabric selection! The blue is great.
This quilt is going to my midwife to say thanks for giving me a healthy little baby boy. I'm hoping to have it done by Tuesday when she comes over, but machine quilting is not my forte! We shall see.
Next post - making the batting sandwich.

So the next job is finishing the quilt by applying the borders. Borders really bring a quilt to life! Plus they give it alot more size. I didn't have the time to choose my own borders with the new baby, so I sent Shane into the local patchwork shop to a salesperson I really trust (who has impeccable taste) with a list, and this is what she sent out!

I'm going for finished 2" borders of the blue (so cut 2.5") and 5.5" outer borders. If you take your finished quilt top into any patchwork shop they will be able to calculate your required meterage for borders. I also have enough of the floral to do the binding as well.
The first job is cutting the borders. I didn't iron first - very naughty!!

Depending on how much fabric you have, you can cut with the length, or across the length. In the case of the inner borders, I only have about 0.5m, so I need to cut my strips across the length. This means I'll need to join strips to get enough length across the quilt top. So I'm cutting 6 strips.

Once you have sewn length on the strips, you iron them, and lay them across your quilt top - in the middle of the quilt. This is a really important step as it allows you to square up your quilt top.
A log cabin is fairly easy to square up as there is a lovely line that runs through the middle of the quilt.

Trim the blue border on each side accurately. I usually do this with a cutting board under the quilt and use a ruler and a rotary cutter. This time I used scissors.... Not that good really.

Pin on opposite sides of the quilt and sew.

Iron out flat, and follow the same process with the other side.

Trim, pin and sew.


Once you have completed the inner border, its time to do the outer border, and its just following the same process.
Lay the strips out in the middle of the quilt.
Trim, pin, sew and iron.


Repeat on the other side.
One thing to be very cautious about is whether your print has a direction on it. If it does (like mine does) try to ensure that you get the print facing all the same way.

Once you have sewn the outer border on the quilt, you are done! Now its time to make the batting sandwich and quilt it.

What do you think of my finished product (or at least finished quilt top) ? Its amazing how the borders will really finish a quilt off. And once the padding is beneath it, there is a whole new effect to it.
I really like it - its scrappy, but very pretty. I think Stephanie from Grandmother's Garden did a lovely job in her fabric selection! The blue is great.
This quilt is going to my midwife to say thanks for giving me a healthy little baby boy. I'm hoping to have it done by Tuesday when she comes over, but machine quilting is not my forte! We shall see.
Next post - making the batting sandwich.
Subscribe to:
Posts (Atom)